
How to Create a Client Portal in Squarespace
Need a client portal for your squarespace business? Not to worry here are our proven methods about How to Create a Client Portal in Squarespace
Table of content
- Introduction
- Steps for Creating a Client Portal in Squarespace using the Protected Blogs
- Steps for Creating a Client Portal Squarespace by Member Areas
- What You Need to Do for Creating a Client Portal in Squarespace
- Shayna S

- 22 Aug, 2024
Creating a client portal on your website is an excellent way to enhance your business operations, improve client satisfaction, and streamline communication. Squarespace, a popular website‑building platform, offers a wide range of tools to help you set up a professional and efficient client portal. In this article, we'll walk you through the process step‑by‑step about how you can create a client portal in Squarespace.
Steps for Creating a Client Portal in Squarespace using the Protected Blogs Method
Cost and Time Estimates
Estimated Cost: $16/mo to $65/mo
Time: Approximately 1 hour
Using protected blogs is a straightforward and cost‑effective way to set up a client portal in Squarespace. This method leverages the existing blogging functionality and password protection features.
Step 1: Create a New Blog
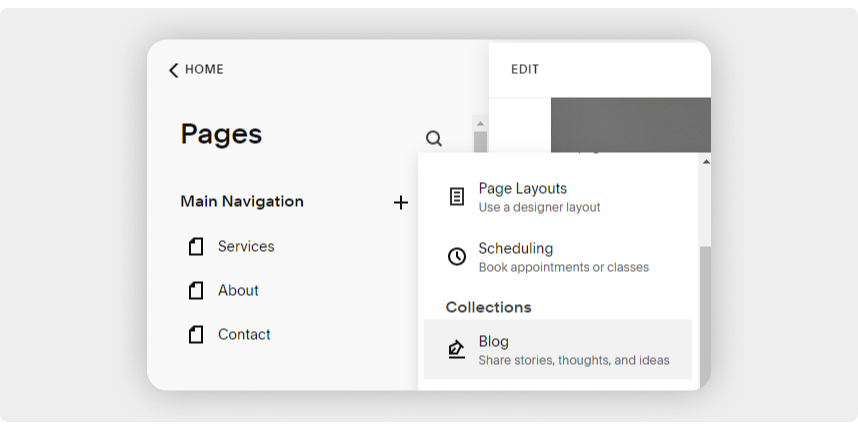
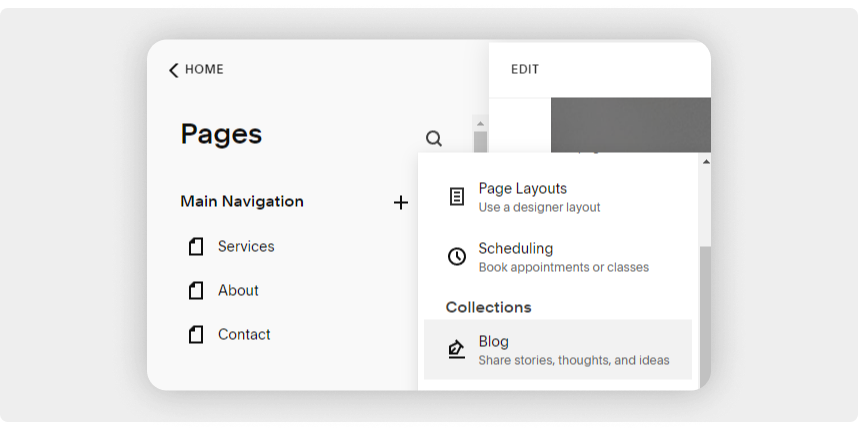
Navigate to the Pages Section:Begin by logging into your Squarespace account. From your dashboard, look for the option that says 'Pages' and click on it. This will take you to the page builder, where you can manage and create new pages for your site.
Add a New Blog:In the Pages section, find the + sign or 'Add' button. Click on this to start the process of creating a new blog. Squarespace offers different blog styles, so choose one that fits your needs and preferences. Whether you want a simple layout or something more dynamic, select the style that works best for your project.
Step 2: Add Password Protection and a Relevant Name
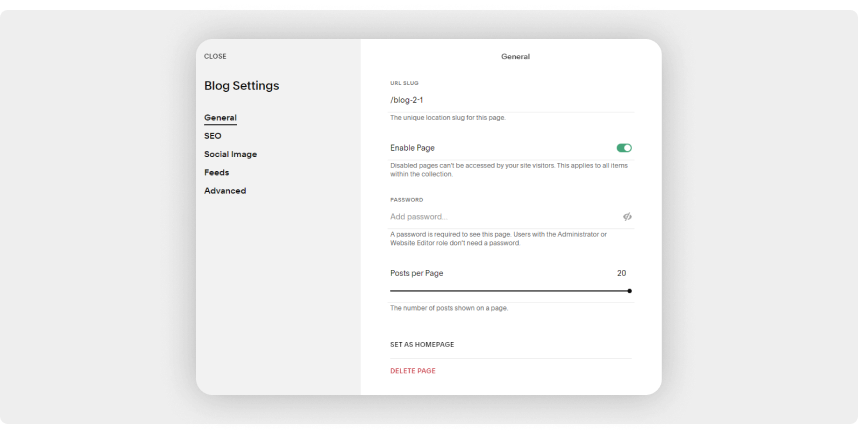
Assign a Name: Give your blog a meaningful name that reflects its purpose. For example, if it's for a specific client, you might name it 'Client X' so it's easily identifiable. This helps you stay organized, especially if you manage multiple client blogs.
Set a Password: To keep the blog private, click on the settings icon, usually represented by a gear or similar symbol. In the settings menu, look for the password protection option. Set a password for the blog, and make sure it is something secure yet easy to remember. You will share this password with your client to ensure that only they can access the blog.
Step 3: Create Posts for Each Client Portal Entry
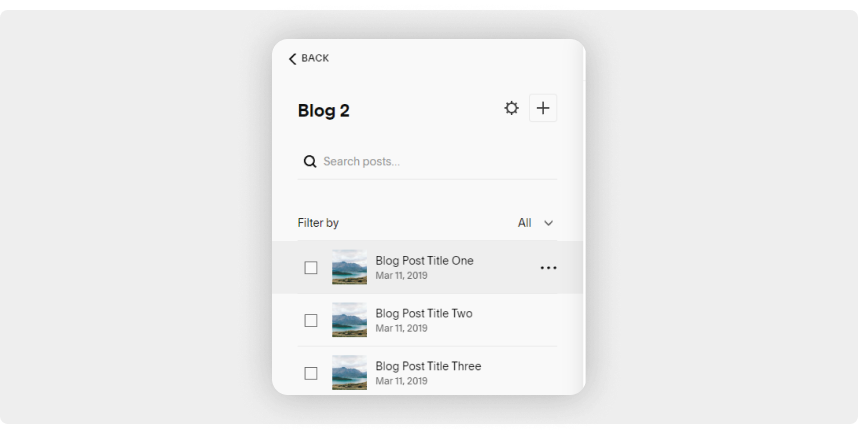
Add Posts: Inside your new blog, you will create individual posts. Each post can cover different aspects of your client's project. For example, you can have separate posts for tasks that need to be completed, invoices, project updates, and any other relevant information. This makes it easy for your client to find and review specific details.
Enable Comments: To allow your client to give feedback or ask questions, go to Settings > Options > Comments. Enable the comments feature on your posts. This way, your client can interact directly with each post, making communication more streamlined and efficient.
Step 4: Send the Blog Link to Your Client
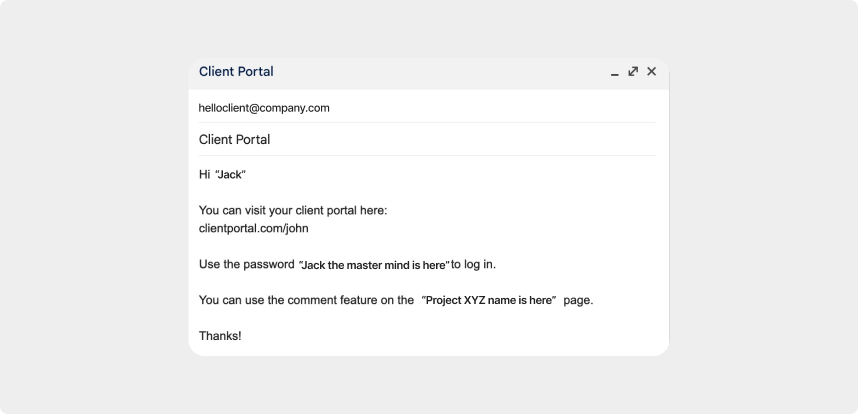
Share the Link and Password: Once your blog is set up and posts are created, it's time to share it with your client. Send them an email with the link to the blog and the password you set earlier. This ensures they can access their dedicated portal.
Provide Usage Instructions: In your email, include clear instructions on how to navigate the blog. Explain how they can view different posts, leave comments, and provide feedback. Clear guidance helps your client use the portal effectively, ensuring smooth communication and project management.
Pros and Cons of Using Protected Blogs to Create a Client Portal
Pros:
Cost‑Effective: Utilizing existing Squarespace subscriptions.
Customizable: Flexibility in blog styles and post creation.
Cons:
Limited Interaction: Clients can only provide feedback through comments.
Manual Updates: Requires regular updates and password management.
Steps for Creating a Client Portal Squarespace by Member Areas
Creating a client portal using Member Areas is an advanced method that offers greater customization and security compared to simpler approaches. This method allows you to provide individual logins for your clients and personalized member areas, giving each client a unique experience tailored to their needs. By using this method, you can enhance your clients' sense of exclusivity and professionalism.
Cost and Time Estimates:
Cost: $25 to $105 per month, depending on the plan you choose and the level of features you need.
Time: Approximately 2 hours, which includes the setup of member areas, creating content, and configuring settings.
Step 1: Enable Member Areas
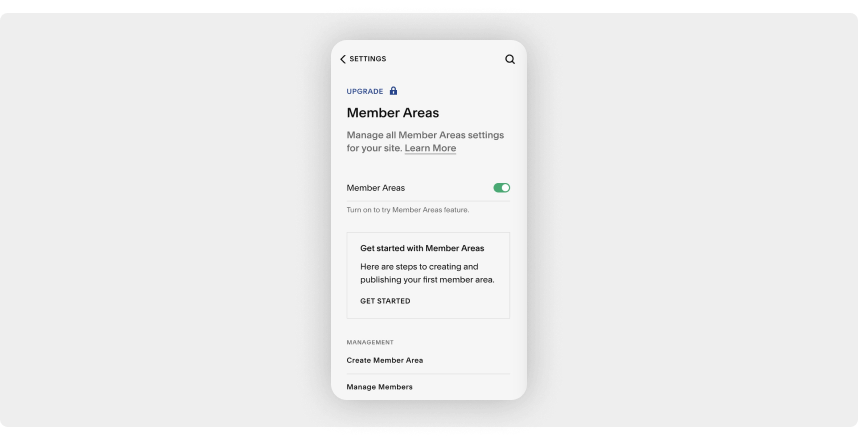
Access Settings: Start by navigating to the main Squarespace dashboard. From there, go to Settings and look for the Member Areas option. This feature is crucial for setting up individual client areas.
Sign Up for a Plan: You will need to select a plan that includes the Member Areas feature. Evaluate the different options available and choose the one that best fits your business needs. Once selected, enable the Member Areas feature to start the setup process.
Step 2: Create a New Member Area
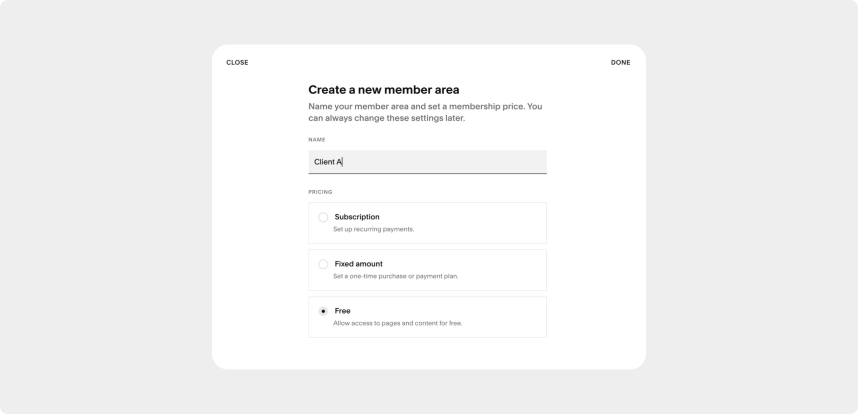
Create Member Area: After enabling Member Areas, click on the option to “Create Member Area.” This is where you can set up different membership levels. For each client, you can create a specific area that they can access with their unique login.
Assign client‑specific Areas: Make sure to assign a unique member area to each client. This ensures that each client has exclusive access to their own content, providing a personalized experience.
Step 3: Create a Protected Blog within the Member Area
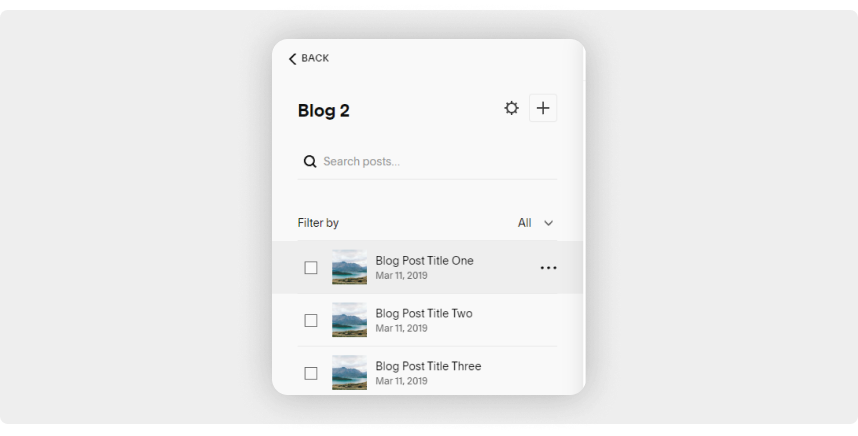
Add a Blog: Within each clients member area, use the plus icon to add a new blog. This blog can be used to share updates, information, and other content specific to that client.
Password Protection: Ensure that this blog is password protected. This adds an additional layer of security, making sure that only the specific client can access the information shared in their blog.
Step 4: Create Posts for Each Activity
Add Posts: Start creating posts for various activities or updates you want to share with your clients. These posts can include detailed information about projects, tasks, or any other relevant activities.
Enable Comments: Allow clients to interact with these posts by enabling comments. This facilitates communication and feedback directly within their protected member area.
Step 5: Create a Sign‑Up Form
Step 5.1: Create a New Page Outside the Member Area
Add a Public Page: Create a new page on your website that is accessible to the public but is not linked in the main menu. This page will serve as the entry point for new clients to sign up for their member areas. Step 5.2: Add the Member Signup Form Block
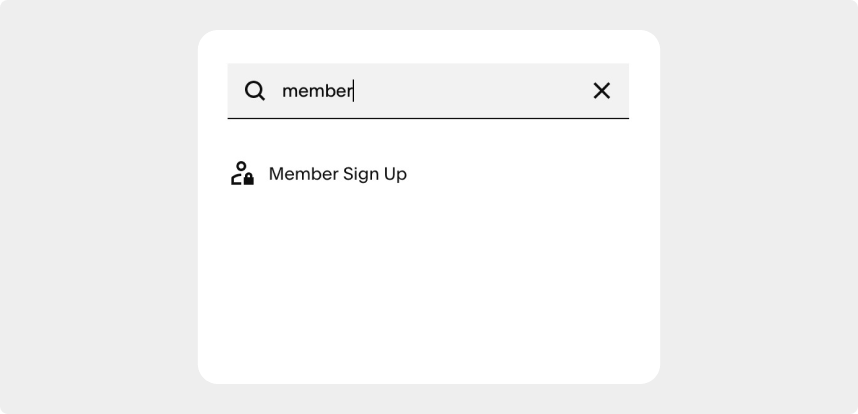
Edit Page: On the newly created page, click on the edit button. Add a blank section to the page and insert a “Member Sign Up” block. This block will allow clients to sign up for access to their member areas.
Step 5.3: Assign the Correct Member Area
Edit Form: Ensure that the sign‑up form is configured to link to the correct member area. This ensures that when a client signs up, they are granted access to the appropriate member area.
Step 5.4: Customize Design Elements
Design Page: Customize the design of the sign‑up form page to match your brands look and feel. This creates a cohesive and professional appearance for your clients.
Step 6: Send Form to Customers
Share Sign‑Up Link: Once the sign‑up page is ready, share the link with your clients via email. Provide them with clear instructions on how to sign up and access their client area. This step is crucial for onboarding new clients smoothly.
Step 7: Manage Members
Monitor Sign‑Ups: Regularly check the member sign‑ups to ensure that only authorized clients are registering. This helps in maintaining the security and exclusivity of your member areas.
Pros and Cons of Using Member Areas to Create a Client Portal
Pros:
Individual Logins: Clients can log in with their own accounts.
Customizable Experience: Personalize each clients member area.
Cons:
Additional Costs: Requires an add‑on on top of the existing Squarespace plan.
Member Area Limitations: Limited to 10 member areas per website, necessitating multiple subscriptions for more clients.
Looking to build your custom client portal?
Learn moreWhat You Need to Do for Creating a Client Portal in Squarespace
Setting Up Your Squarespace Account
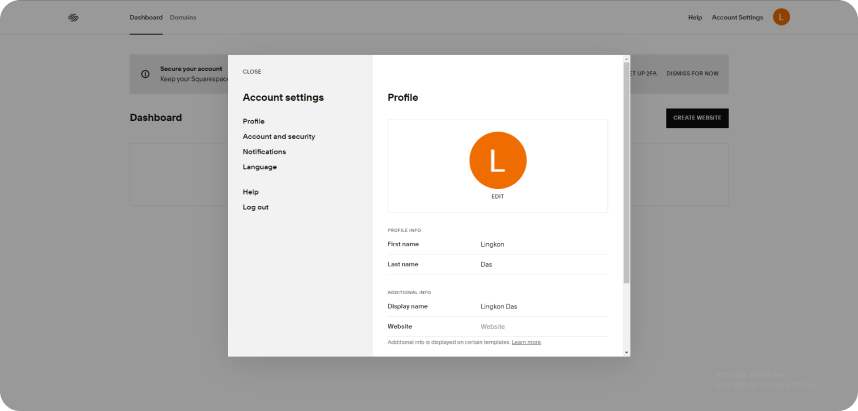
Choose the Right Squarespace Plan
Squarespace offers several plans. For a client portal, you'll need a plan that supports member areas and advanced features, such as the Business or Commerce plans.
Setting Up Your Squarespace Website
If you don't already have a website, sign up and set up your site. Follow the guided setup to choose a domain and get started.
Selecting a Template
Choose a template that suits your business needs. Squarespace offers a variety of templates, many of which can be customized for a client portal.
Designing the Client Portal
Customizing the Template
Customize your chosen template to match your brand. Adjust colors, fonts, and layout to create a professional look.
Creating Custom Pages
Design specific pages for your client portal. Key pages to include are:
Dashboard: A central hub for clients to view updates and access other sections.
Profile Page: Where clients can manage their personal information.
Project Management: A page to track project milestones, tasks, and deliverables.
Document Sharing: A secure area for uploading and downloading files.
Support/Helpdesk: A section for submitting and tracking support tickets.
Adding Navigation Links
Ensure easy navigation by adding links to the client portal in your site's main menu. This helps clients quickly find their way to the portal.
Implementing Key Features
User Authentication and Security
Security is paramount for a client portal. Implement robust user authentication methods to protect client information.
Password Protection
Enable password protection for the client portal. Each client should have a unique login to access their information.
Member Areas
Use Squarespace's Member Areas feature to create private sections for your clients. This allows you to control who has access to different parts of the portal.
File Sharing and Storage
Utilize Squarespace’s built‑in features for file sharing and storage. You can also integrate third‑party solutions for added functionality.
Using Squarespace’s Built‑in Features
Squarespace allows you to upload and share files directly on your website. This is useful for sharing documents, contracts, and other important files.
Integrating Third‑party Solutions
Integrate services like Dropbox or Google Drive for additional storage and file sharing options. This can provide more flexibility and capacity.
Enhancing the Client Portal with Plugins and Integrations
Overview of Squarespace Extensions
Squarespace offers various extensions to enhance your website’s functionality. Explore these extensions to find tools that can improve your client portal.
Popular Plugins for Client Portals
Several plugins can add valuable features to your client portal. Here are a few recommended ones:
MemberSpace: Adds membership capabilities, allowing you to create and manage member‑only areas.
Sentry Login: Provides secure login and authentication features.
MoonClerk: A flexible payment solution for recurring and one‑time payments. Creating a client portal in Squarespace is a strategic move to enhance client relationships and
streamline business operations. By following the steps outlined in this guide, you can set up a professional and efficient client portal that meets your business needs. Encourage your clients to utilize the portal for a better, more organized interaction with your services.
If you need more customization with more features, you can create custom client portals through a custom client portal dashboard service provider.
Looking to build your custom client portal?
Learn more
Looking to build your custom client portal?
Learn moreRelated Articles

5 Reasons Why Excel Doesn't Work For Project Management
Microsoft Excel has become a popular tool for project management. But here are 5 reasons why not to use Excel for project management.

Measuring the ROI of Digital Transformation
Discover how to measure the ROI of digital transformation with our guide, covering key metrics, methods, and best practices for assessing impact.

Digital Transformation ‑ The Ultimate Guide
Explore Digital Transformation ‑ The Ultimate Guide for a comprehensive overview of strategies, technologies, and best practices to modernize your business
Ready to put AI to work in your business?
Bring the idea or the workflow. We’ll help you find a useful next step.
Schedule a free consultation